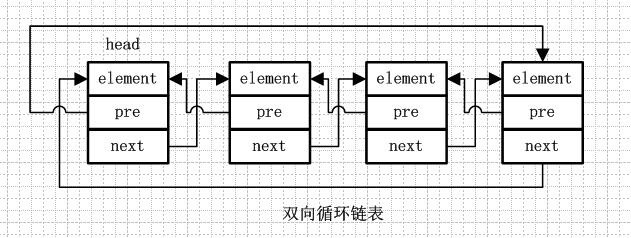
LinkedList 实现分析及使用

jdk中的绝大部分代码都是经过千锤百炼的,代码质量非常之高,在了解其底层实现的过程中,也可以帮助我们提高编码规范,养成良好的习惯。知识在于总结和利用,基础知识的完善会让工作变更加轻松。本文通过分析 LinkedList 的底层实现来学习 LinkdedList 的使用。

LinkedList 实现分析

LinkedList 是实现 list 的线性存储结构的一个重要的实现类,LinkedList 是通过链表的形式存放数据,而ArrayList和Vector是通过数组存储的顺序结构。当然, LinkedList 也是非线程安全的,我们会在后文说明如何在多线程环境中使用它。

LinkedList具体实现类图如下:

LinkedList 类继承关系

通过图中的我们可以清晰的看到 LinkedList 即实现了 list 接口又实现了 Deque 接口。那说明 LinkedList 具有所有 list 的功能同时,还具备队列的功能。通过阅读 JDK 的源码文档,我们发现 LinkedList 是基于双向队列的数据结构实现的 (Doubly-linked list)。

具体结构我们可以参考下图:

双向链表数据结构

双向链表的数据结构

LinkedList 是通过链表结构来存储数据,而且实现的是双向链表。双向链表是数据结构的一种形式,他的每个节点维护两个指针, prev 指向上一个节点,next 指向下一个节点。这种结构有什么特点呢?他可以实现双向遍历,这使得在链表中的数据读取变得非常灵活自由。同时,LinkedList 中维护了两个指针,一个指向头部,一个指向尾部。维护这两个指针后,可以使得元素从头部插入,也可以使元素从尾部插入。基于方式,用户很容易就能实现 FIFO(队列), LIFO(栈)等效果。那么下面我们来看一下源码中的具体实现。

Node定义

1
2
3
4
5
6
7
8
9
10
11
private static class Node<E> {
E item;
Node<E> next;
Node<E> prev;

Node(Node<E> prev, E element, Node<E> next) {
this.item = element;
this.next = next;
this.prev = prev;
}
}

LinkedList列表的新增

1
2
3
4
5
6
7
8
9
10
11
12
13
14
15
16
17
18
public boolean add(E e) {
linkLast(e);
return true;
}
/**
* Links e as last element.
*/
void linkLast(E e) {
final Node<E> l = last;
final Node<E> newNode = new Node<>(l, e, null);
last = newNode;
if (l == null)
first = newNode;
else
l.next = newNode;
size++;
modCount++;
}

可见每次插入都是移动引用,和 ArrayList 的拷贝数组来说效率要高上不少。

LinkedList列表的查询

1
2
3
4
5
6
7
8
9
10
11
12
13
14
15
16
17
18
19
20
public E get(int index) {
checkElementIndex(index);
return node(index).item;
}

Node<E> node(int index) {
// assert isElementIndex(index);

if (index < (size >> 1)) {
Node<E> x = first;
for (int i = 0; i < index; i++)
x = x.next;
return x;
} else {
Node<E> x = last;
for (int i = size - 1; i > index; i--)
x = x.prev;
return x;
}
}

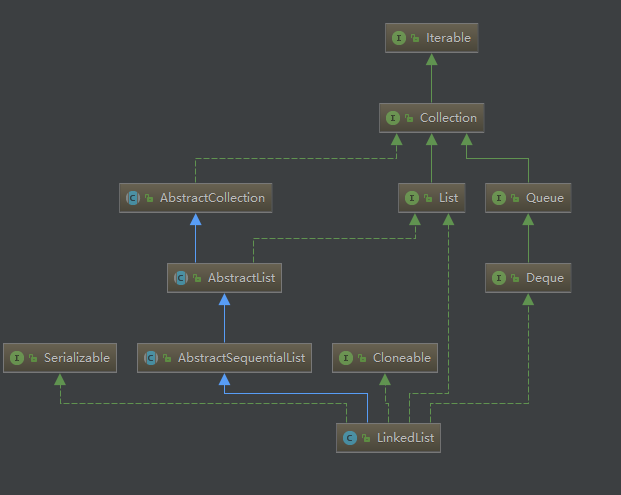
LinkedList使用二分查找来看 index 离 size 中间距离来判断是从头结点正序查还是从尾节点倒序查。这样的效率是非常低的,特别是当 index 距离 size 的中间位置越远时。

LinkedList 迭代实现

LinkedList 的迭代器实现有两个,一个是实现了Iterator接口的DescendingIterator,另一个则是实现了 ListIterator 接口的 ListItr 。

ListItr 实现

ListItr遍历需要指定一个起始值

1
2
3
4
public ListIterator<E> listIterator(int index) {
checkPositionIndex(index);
return new ListItr(index);
}

ListItr 会创建一个以 index 为起始值的迭代器,然后用户便可以以这个位置为起点,实现向前或者向后遍历。

1
2
3
4
5
6
7
8
9
10
11
12
13
14
15
16
17
18
19
20
21
22
23
24
25
26
27
28
ListItr(int index) {
// 实例化的时候,将next指针指向指定位置的元素
next = (index == size) ? null : node(index);
nextIndex = index;
}

// 向后遍历
public E next() {
checkForComodification();
if (!hasNext())
throw new NoSuchElementException();

lastReturned = next;
next = next.next;
nextIndex++;
return lastReturned.item;
}

// 向前遍历
public E previous() {
checkForComodification();
if (!hasPrevious())
throw new NoSuchElementException();

lastReturned = next = (next == null) ? last : next.prev;
nextIndex--;
return lastReturned.item;
}

DescendingIterator 实现

DescendingIterator 迭代器实现的是对链表从尾部向头部遍历的功能,他复用了ListItr中的previous方法,将当前位置指向链表尾部,然后逐个向前遍历。

1
2
3
4
5
6
7
8
9
10
11
12
private class DescendingIterator implements Iterator<E> {
private final ListItr itr = new ListItr(size());
public boolean hasNext() {
return itr.hasPrevious();
}
public E next() {
return itr.previous();
}
public void remove() {
itr.remove();
}
}

LinkedList 的队列实现

从图1我们可以发现 LinkedList 实现了 Deque 接口,以下我们可以从实现队列的功能来看 LinkedList 的源码

LikedList 的 FIFO 队列的实现

1
2
3
4
5
6
7
8
9
10
11
12
13
14
15
16
17
18
19
20
21
22
23
24
25
26
27
28
29
30
31
32
33
34
35
36
37
38
39
40
41
42
43
44
45
46
47
48
49
50
51
52
53
54
55
56
57
58
59
60
61
62
63
64
65
66
67
// 入队功能,入尾

//在队列尾部增加一条记录,建议使用
public boolean offer(E e) {
return add(e);
}

public boolean offerLast(E e) {
addLast(e);
return true;
}

//在队列尾部增加一条记录
public boolean add(E e) {
linkLast(e);
return true;
}

//方法包装,同样调用了linkLast的方法
public void addLast(E e) {
linkLast(e);
}

void linkLast(E e) {
final Node<E> l = last;
//创建一个节点,将 prev 指针指向链表的尾节点
final Node<E> newNode = new Node<>(l, e, null);
last = newNode;
//将last指针指向新创建的这个节点
if (l == null)
//如果当前链表为空,那么将头指针也指向这个节点
first = newNode;
else
//将链表的尾节点的next指针指向新建的节点,这样就完整的实现了在链表尾部添加一个元素的功能
l.next = newNode;
size++;
modCount++;
}

//出队功能,从尾出队
//在队列头部取出一个元素并删除, 队列操作建议使用这个方法
public E poll() {
final Node<E> f = first;
return (f == null) ? null : unlinkFirst(f);
}

//同上,都调用了 unlinkFirst 方法
public E pollFirst() {
final Node<E> f = first;
return (f == null) ? null : unlinkFirst(f);
}

private E unlinkFirst(Node<E> f) {
// assert f == first && f != null;
final E element = f.item;
final Node<E> next = f.next;
f.item = null;
f.next = null; // help GC
first = next;
if (next == null)
last = null;
else
next.prev = null;
size--;
modCount++;
return element;
}

LinkedList 的 LIFO (栈)实现

1
2
3
4
5
6
7
8
9
10
11
12
13
14
15
16
17
18
19
20
21
22
23
24
25
26
27
28
29
30
31
32
33
34
35
36
37
38
39
40
41
42
43
44
45
46
47
48
49
// 在链表的头部添加一个元素
public void push(E e) {
addFirst(e);
}

// addFirst 调用的就是 linkFirst ,这段代码就是实现将元素添加的链表头部。
private void linkFirst(E e) {
final Node<E> f = first;
// 创建一个新元素,将元素的 next 指针指向当前的头结点
final Node<E> newNode = new Node<>(null, e, f);
// 将头指针指向这个节点。
first = newNode;
if (f == null)
// 如果当前节点为空,则把尾指针指向这个节点。
last = newNode;
else
// 将当前头结点的 prev 指针指向此结点。
f.prev = newNode;
size++;
modCount++;
}

// 弹出顶部结点。
public E pop() {
return removeFirst();
}

// removeFirst 调用的就是 unlinkFirst,unlinkFirst 实现将链表顶部元素删除
private E unlinkFirst(Node<E> f) {
// assert f == first && f != null;
final E element = f.item;
final Node<E> next = f.next;
f.item = null;
f.next = null; // help GC
first = next;
if (next == null)
last = null;
else
next.prev = null;
size--;
modCount++;
return element;
}

// 获取顶部结点,但是不删除
public E peek() {
final Node<E> f = first;
return (f == null) ? null : f.item;
}

总结:

  • 克服数组链表需要预先知道数据大小的缺点。
  • 可以充分利用计算机内存空间,实现灵活的内存动态管理。
  • LinkedList 插入,删除都是移动引用效率很高。
  • 查找需要进行遍历查询,效率较低。
分享到 评论