ArrayList & Vector 实现分析

通过阅读 ArrayList 与 Verctor 的源码我们发现,它们的代码实现近似度几乎在90%。所以我把它们两个合并起来进行说明,细心的读者可以自行去IDE中阅读,比对他们的实现结构。本文主要结合 JDK8 源码介绍了 ArrayList 和 Vector 的创建、增、删、改以及集合的迭代和 fail-fast 机制,并说明了在操作子集的一些注意事项及原因。

无特别说明,JDK 源码讲解都是基于 JDK8 进行的分析。

ArrayList 和 Vector 的异同

在讲它们的异同点之前,我们先看看 ArrayList 和 Vector 的继承结构图
ArrayList 类继承关系 Vector 类继承关系

相同点

  1. 都是有序的,插入元素可重复,支持插入 null ,支持随机访问。
  2. 从上图可以发现 ArrayList 和 Vector 继承了相同的父类和实现了相同的接口,所以提供的功能也基本相同。
  3. 集合中维护的都是 Object 类型的数组,通过泛型方式来指定数组的类型。
  4. 初始如果没有指定集合的长度大小,则集合默认数组长度都为10。
  5. 都实现了 Iterator 和 ListIterator 接口,所以具有相同的遍历方式。
  6. ArrayList 和 Vector 都具有动态扩容的特性。

不同点

  1. Vector 的实现是线程安全的,因为操作集合的方法使用了关键字 Synchronized ,而使用线程同步的最大问题就是大并发下,操作集合程序性能会严重降低,而 ArrayList 的实现是线程不安全的,所以不考虑线程安全的情况,尽量使用 ArrayList。
  2. 当 ArrayList 和 Vector 的大小超过当前所能容纳元素的数组大小时,ArrayList 会扩大为当前数组的 50% 来容纳新元素,而 Vector中有一个capacityIncrement 变量,如果 capacityIncrement > 0, 则每次扩容都在原来大小基础上增加 capacityIncrement 大小, 反之,Vector 就在原大小基础上再扩充一倍。
  3. Vector中有一个方法 setSize(int newSize),而ArrayList并没有。 setSize 允许用户主动设置容器大小,如果newSize小于当前 size ,那么elementData 数组中只会保留 newSize 个元素,多出来的会设为 null。如果newSize大于当前 size ,那么就扩容到 newSize 大小,数组中多出来的部分设为 null,以后添加元素的时候,之前多出来的部分就会以 null 的形式存在。

集合创建

ArrayList

1
2
3
4
5
6
7
8
9
10
11
12
13
14
15
16
17
18
19
20
21
22
23
24
25
26
27
28
29
30
31
32
33
34
35
36
37
38
39
40
41
42
43
44
45
46
47
48

private static final int DEFAULT_CAPACITY = 10;

/**
* Shared empty array instance used for empty instances.
*/
private static final Object[] EMPTY_ELEMENTDATA = {};

/**
* 序列化时,忽略该值
*/
transient Object[] elementData;

/**
* Shared empty array instance used for default sized empty instances. We
* distinguish this from EMPTY_ELEMENTDATA to know how much to inflate when
* first element is added.
* 与 EMPTY_ELEMENTDATA 区分开的目的是,添加第一个元素的时候可以确定数组的指定长度
*/
private static final Object[] DEFAULTCAPACITY_EMPTY_ELEMENTDATA = {};

private int size;

public ArrayList(int initialCapacity) {
if (initialCapacity > 0) {
this.elementData = new Object[initialCapacity];
} else if (initialCapacity == 0) {
this.elementData = EMPTY_ELEMENTDATA;
} else {
throw new IllegalArgumentException("Illegal Capacity: "+ initialCapacity);
}
}

public ArrayList() {
this.elementData = DEFAULTCAPACITY_EMPTY_ELEMENTDATA;
}

public ArrayList(Collection<? extends E> c) {
elementData = c.toArray();
if ((size = elementData.length) != 0) {
// c.toArray might (incorrectly) not return Object[] (see 6260652)
if (elementData.getClass() != Object[].class)
elementData = Arrays.copyOf(elementData, size, Object[].class);
} else {
// replace with empty array.
this.elementData = EMPTY_ELEMENTDATA;
}
}

ArrayList 提供了三种方式来进行初始化,当使用默认构造器初始化集合时,数据存储在静态变量 DEFAULTCAPACITY_EMPTY_ELEMENTDATA 数组中,这个数组是由 static 和 final 修饰,使用静态变量的好处就是 JVM 加载类的同时,会把静态变量存储于 JVM 的方法区(各个线程共享的内存区域),与每次 new Object[initialCapacity] 相比,就减少了系统的开销,而使用 final 修饰指定该变量不能修改,是因为这是一个公共变量,修改后,会影响后续新初始化的 ArrayList。如果使用可以指定集合初始化大小构造器进行,如果指定大小为0 ,则把 EMPTY_ELEMENTDATA 赋值给初 elementData,如果指定的大小大于 0 ,则需要 new Object[initialCapacity] 并把新创建的数组赋值给 elementData 数组变量。DEFAULTCAPACITY_EMPTY_ELEMENTDATA 和 EMPTY_ELEMENTDATA 主要是为了区分不同构造器创建的 ArrayList 对象,这个后面会进行详细介绍。 ArrayList 提供接受实现 Collection 接口的实现类来进行初始化。

Vector

1
2
3
4
5
6
7
8
9
10
11
12
13
14
15
16
17
18
19
20
21
22
23
24
25
26
27
28
29
30

protected Object[] elementData;

protected int elementCount;

protected int capacityIncrement;

public Vector(int initialCapacity, int capacityIncrement) {
super();
if (initialCapacity < 0)
throw new IllegalArgumentException("Illegal Capacity: " + initialCapacity);
this.elementData = new Object[initialCapacity];
this.capacityIncrement = capacityIncrement;
}

public Vector(int initialCapacity) {
this(initialCapacity, 0);
}

public Vector() {
this(10);
}

public Vector(Collection<? extends E> c) {
elementData = c.toArray();
elementCount = elementData.length;
// c.toArray might (incorrectly) not return Object[] (see 6260652)
if (elementData.getClass() != Object[].class)
elementData = Arrays.copyOf(elementData, elementCount, Object[].class);
}

Vector 与 ArrayList 不同的是提供了一个可以指定 capacityIncrement (增加因子)的构造器,增长因子的作用主要是对数组进行扩容时,指定数组在原来数组长度的基础上在扩容多大

集合增加、修改元素

ArrayList 集合新增元素主要是调用 add(E e)add(int index, E element) 方法,添加元素之前,都需要对数组扩容进行检查,add(E e) 在数组末尾添加元素,add(int index, E element) 是在数组指定位置添加元素,所以该位置后的原数组元素都要向后移动一位。修改元素调用 set(int index, E e),替换掉元数组,size 不变,下面我们通过具体源码进行学习。

1
2
3
4
5
6
7
8
9
10
11
12
13
14
15
16
17
18
19
20
21
22
23
24
25
26
27
28
29
30
31
32
33
34
35
36
37
38
39
40
41
42
43
44
45
46
47
48
49
50
51
52
53
54
55
56
57
58
59
60
61
62
63
64
65
66
67
68
69
70
71
72
73
74
75
76
77
78
79
80
81
82
83
84
85
86
87
88
89
90
91
92
93
94
95
96
97
98
99
100
101
102
103
104
105
106
107
108
109
110
111
112
113
114
115
116
117
118
119
120
121
122
123

public boolean add(E e) {
// 检查扩容
ensureCapacityInternal(size + 1); // Increments modCount!!
//每次都会把最新添加的元素放到数组末尾
elementData[size++] = e;
return true;
}

public void add(int index, E element) {
//检查数组是否越界
rangeCheckForAdd(index);

ensureCapacityInternal(size + 1); // Increments modCount!!
//移动指定位置后的元素
System.arraycopy(elementData, index, elementData, index + 1, size - index);
//插入元素
elementData[index] = element;
size++;
}

// 添加集合元素
public boolean addAll(Collection<? extends E> c) {
Object[] a = c.toArray();
int numNew = a.length;
ensureCapacityInternal(size + numNew); // Increments modCount
// 数组移动并拷贝到 elementData 数组中
System.arraycopy(a, 0, elementData, size, numNew);
size += numNew;
return numNew != 0;
}

//在指定位置添加集合元素
public boolean addAll(int index, Collection<? extends E> c) {
rangeCheckForAdd(index);

Object[] a = c.toArray();
int numNew = a.length;
ensureCapacityInternal(size + numNew); // Increments modCount

int numMoved = size - index;
if (numMoved > 0)
//对自身进行移动并 copy 元素
System.arraycopy(elementData, index, elementData, index + numNew,
numMoved);
// copy 集合中的元素到 elementData 中
System.arraycopy(a, 0, elementData, index, numNew);
size += numNew;
return numNew != 0;
}

private static int calculateCapacity(Object[] elementData, int minCapacity) {
// DEFAULTCAPACITY_EMPTY_ELEMENTDATA 的作用
//使用默认构造器创建的对象,第一次新增元素时,指定数组默认长度为10
if (elementData == DEFAULTCAPACITY_EMPTY_ELEMENTDATA) {
return Math.max(DEFAULT_CAPACITY, minCapacity);
}
return minCapacity;
}

private void ensureCapacityInternal(int minCapacity) {
ensureExplicitCapacity(calculateCapacity(elementData, minCapacity));
}

private void ensureExplicitCapacity(int minCapacity) {
modCount++;

// overflow-conscious code
if (minCapacity - elementData.length > 0)
grow(minCapacity);
}

private static final int MAX_ARRAY_SIZE = Integer.MAX_VALUE - 8;

private void grow(int minCapacity) {
// overflow-conscious code
int oldCapacity = elementData.length;
//oldCapacity >> 1和oldCapacity / 2是等效的,newCapacity为原来的1.5倍
int newCapacity = oldCapacity + (oldCapacity >> 1);
if (newCapacity - minCapacity < 0)
newCapacity = minCapacity;
if (newCapacity - MAX_ARRAY_SIZE > 0) //数组不是无限大,需注意
newCapacity = hugeCapacity(minCapacity);
// minCapacity is usually close to size, so this is a win:
//进行数组拷贝,Arrays.copyOf的底层是一个native方法
elementData = Arrays.copyOf(elementData, newCapacity);
}

private static int hugeCapacity(int minCapacity) {
if (minCapacity < 0) // overflow
throw new OutOfMemoryError();
return (minCapacity > MAX_ARRAY_SIZE) ?
Integer.MAX_VALUE :
MAX_ARRAY_SIZE;
}

public E set(int index, E element) {
rangeCheck(index);

//查找元素 O(1)
E oldValue = elementData(index);
//替换掉原数据
elementData[index] = element;
return oldValue;
}

private void rangeCheck(int index) {
if (index >= size)
throw new IndexOutOfBoundsException(outOfBoundsMsg(index));
}

/**
* A version of rangeCheck used by add and addAll.
*/
private void rangeCheckForAdd(int index) {
if (index > size || index < 0)
throw new IndexOutOfBoundsException(outOfBoundsMsg(index));
}

@SuppressWarnings("unchecked")
E elementData(int index) {
return (E) elementData[index];
}

动态扩容

ArrayList 和 Vector 的新增、修改元素的逻辑基本一致,不同的地方就是会在每个方法上使用 synchronized 关键字进行同步,这里重点说明下他们动态扩容的不同之处.

Vector 的动态扩容机制

1
2
3
4
5
6
7
8
9
10
11
12
13
14
15
16
17
18
19
20
21
22
23
24
25
26
27
28
29
30
31
32
33
34
35
36
37
38

public synchronized boolean add(E e) {
modCount++;
//数组扩容
ensureCapacityHelper(elementCount + 1);
//末尾插入元素
elementData[elementCount++] = e;
return true;
}

private void ensureCapacityHelper(int minCapacity) {
// overflow-conscious code
if (minCapacity - elementData.length > 0)
grow(minCapacity);
}

private static final int MAX_ARRAY_SIZE = Integer.MAX_VALUE - 8;

private void grow(int minCapacity) {
// overflow-conscious code
int oldCapacity = elementData.length;
// capacityIncrement > 0 则扩容 capacityIncrement 大小,否则扩容原来的一倍
int newCapacity = oldCapacity + ((capacityIncrement > 0) ?
capacityIncrement : oldCapacity);
if (newCapacity - minCapacity < 0)
newCapacity = minCapacity;
if (newCapacity - MAX_ARRAY_SIZE > 0)
newCapacity = hugeCapacity(minCapacity);
elementData = Arrays.copyOf(elementData, newCapacity);
}

private static int hugeCapacity(int minCapacity) {
if (minCapacity < 0) // overflow
throw new OutOfMemoryError();
return (minCapacity > MAX_ARRAY_SIZE) ?
Integer.MAX_VALUE :
MAX_ARRAY_SIZE;
}

结合 ArrayList 的扩容代码,可以明显看出与 Vector 的不同之处,所以使用类之前阅读代码是很好的编程习惯。

删除集合里的元素

我们这里使用 ArrayList 来说明集合删除元素的逻辑,删除也分为对单个元素的删除和集合删除。

1
2
3
4
5
6
7
8
9
10
11
12
13
14
15
16
17
18
19
20
21
22
23
24
25
26
27
28
29
30
31
32
33
34
35
36
37
38
39
40
41
42
43
44
45
46
47
48
49
50
51
52
53
54
55
56
57
58
59
60
61
62
63
64
65
66
67
68
69
70
71
72
73
74
75
76
77
78
79
80
81
82
83
84
85
86
public E remove(int index) {
rangeCheck(index);

modCount++;
E oldValue = elementData(index);

int numMoved = size - index - 1;
if (numMoved > 0)
//直接进行数组拷贝操作,把index后的所有元素向前移动一位。
System.arraycopy(elementData, index+1, elementData, index, numMoved);
elementData[--size] = null; // clear to let GC do its work

return oldValue;
}

public boolean remove(Object o) {
if (o == null) {
for (int index = 0; index < size; index++)
if (elementData[index] == null) {
fastRemove(index);
return true;
}
} else {
for (int index = 0; index < size; index++)
if (o.equals(elementData[index])) {
fastRemove(index);
return true;
}
}
return false;
}

//之所以叫做快速删除,是因为他被设置为一个私有方法,只能在内部调用,删除元素的时候,省去了数组越界的判断。
//也不返回被删除的元素,直接进行数组拷贝操作。
private void fastRemove(int index) {
modCount++;
int numMoved = size - index - 1;
if (numMoved > 0)
System.arraycopy(elementData, index+1, elementData, index, numMoved);
elementData[--size] = null; // clear to let GC do its work
}

//删除集合中指定的元素,指定中的集合元素不能为 null
public boolean removeAll(Collection<?> c) {
Objects.requireNonNull(c);
return batchRemove(c, false);
}

// 删除不在集合中的元素
public boolean retainAll(Collection<?> c) {
Objects.requireNonNull(c);
return batchRemove(c, true);
}

//批量循环删除
private boolean batchRemove(Collection<?> c, boolean complement) {
final Object[] elementData = this.elementData;
int r = 0, w = 0;
boolean modified = false;
try {
for (; r < size; r++)
// c.contains 默认的是 Collection 接口的方法,在 AbstractCollection 中采用 Iterator 机制来判断是否包含元素,ArrayList 自己实现了此方法
// complement 删除方法调用传入的是 false
// 第一,作者巧妙的提取了逻辑上的最大公约数,仅通过一行逻辑判断就实现了两个互斥的效果。
// 第二,作者的所用操作都集中于 elementData 一个数组上,避免了资源的浪费。
if (c.contains(elementData[r]) == complement)
elementData[w++] = elementData[r];
} finally {
// Preserve behavioral compatibility with AbstractCollection, even if c.contains() throws.
// 理论上r==size 只有当出现异常情况的时候,才会出现r!=size,一旦出现了异常,那么务必要将之前被修改过的数组再还原回来。
if (r != size) {
System.arraycopy(elementData, r, elementData, w, size - r);
w += size - r;
}
// 删除 w 位置后的元素
if (w != size) {
// clear to let GC do its work
for (int i = w; i < size; i++)
elementData[i] = null;
modCount += size - w;
size = w;
modified = true;
}
}
return modified;
}

集合元素的迭代(顺序迭代)

ArrayList 迭代器是通过实现 Iterator 接口 和 ListIterator 接口实现集合的顺序迭代,Iterator 接口主要是向后遍历集合元素,遍历的同时可以对集合中的元素进行删除。ListIterator 是 List 接口提供的方法返回类型,集合类自行实现 ListIterator 接口来实现双向迭代功能, 同时 ListIterator 接口在 Iterator 接口的功能上提供了向前遍历,指定位置前后遍历,修改集合元素,添加集合元素的功能。我们通过源码具体分析 ArrayList 迭代器的实现。

Iterator 接口

Iterator 接口规范了 Java 集合迭代的方式,通过使用迭代器,方便的迭代集合中的元素。同时也是设计模式里的迭代器模式在 JDK 里的具体实现。Java集合中实现 Collection 接口的都实现了 Iterable 接口。

Iterable 接口

1
2
3
4
5
6
7
8
9
10
11
12
13
14
15
16
17
18
19

public interface Iterable<T> {

Iterator<T> iterator();

// add JDK1.8
default void forEach(Consumer<? super T> action) {
Objects.requireNonNull(action);
for (T t : this) {
action.accept(t);
}
}

// add JDK1.8
// JDK 1.8 提供的分割迭代
default Spliterator<T> spliterator() {
return Spliterators.spliteratorUnknownSize(iterator(), 0);
}
}
1
2
3
4
5
6
7
8
9
10
11
12
13
14
15
16
17
18
19
20
21
22
23
24

public interface Iterator<E> {

//判断是否存在下一个元素对象
boolean hasNext();

//获取下一个元素
E next();

// JDK 1.8 支持接口里的方法可以有实现
//删除一个元素
default void remove() {
throw new UnsupportedOperationException("remove");
}

// JDK 1.8 新增
default void forEachRemaining(Consumer<? super E> action) {
Objects.requireNonNull(action);
while (hasNext())
action.accept(next());
}

}
`

ArrayList 的 iterator 代码实现分析

1
2
3
4
5
6
7
8
9
10
11
12
13
14
15
16
17
18
19
20
21
22
23
24
25
26
27
28
29
30
31
32
33
34
35
36
37
38
39
40
41
42
43
44
45
46
47
48
49
50
51
52
53
54
55
56
57
58
59
60
61
62
63
64
65
66
67
68
69
70
71
72
73
74
75
76
77
78
79
80
81
82
83
84
85
86
87
88
89
90
91
92
93
94
95
96
97
98
99
100
101
102
103
104
105
106
107
108
109
110
111
112
113
114
115
116
117
118
119
120
121
122
123
124
125
126
127
128
129
130
131
132
133
134
135
136
137
138
139
140
141
142
143
144
145
146
147
148
149
150
151
152
153
154
155

//Iterable 接口的方法实现
public Iterator<E> iterator() {
return new Itr();
}

//An optimized version of AbstractList.Itr
//大家可以看下 AbstractList 的 Itr 实现
private class Itr implements Iterator<E> {
// 游标
int cursor; // index of next element to return
int lastRet = -1; // index of last element returned; -1 if no such
//集合修改标志
//关于快速失败机制的实现,稍后会有讲解
int expectedModCount = modCount;

Itr() {}

public boolean hasNext() {
return cursor != size;
}

@SuppressWarnings("unchecked")
public E next() {
// 检查集合是否被修改
checkForComodification();
int i = cursor;
if (i >= size)
throw new NoSuchElementException();
Object[] elementData = ArrayList.this.elementData;
if (i >= elementData.length)
throw new ConcurrentModificationException();
cursor = i + 1;
return (E) elementData[lastRet = i];
}

// 调用此方法前,必须调用 next() 方法, 如果不调 next() 方法, 那么 lastRet == -1,程序会报错抛异常
public void remove() {
if (lastRet < 0)
throw new IllegalStateException();
checkForComodification();

try {
ArrayList.this.remove(lastRet);
cursor = lastRet;
lastRet = -1;
expectedModCount = modCount;
} catch (IndexOutOfBoundsException ex) {
throw new ConcurrentModificationException();
}
}

@Override
@SuppressWarnings("unchecked")
public void forEachRemaining(Consumer<? super E> consumer) {
Objects.requireNonNull(consumer);
final int size = ArrayList.this.size;
int i = cursor;
if (i >= size) {
return;
}
final Object[] elementData = ArrayList.this.elementData;
if (i >= elementData.length) {
throw new ConcurrentModificationException();
}
while (i != size && modCount == expectedModCount) {
consumer.accept((E) elementData[i++]);
}
// update once at end of iteration to reduce heap write traffic
cursor = i;
lastRet = i - 1;
checkForComodification();
}
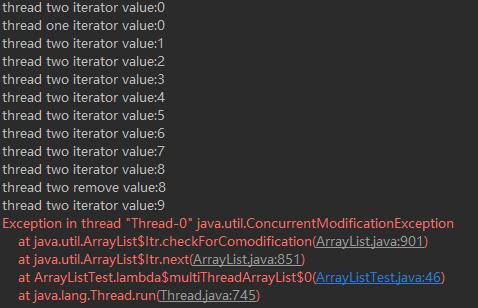
final void checkForComodification() {
if (modCount != expectedModCount)
throw new ConcurrentModificationException();
}
}

// List 接口的方法实现
public ListIterator<E> listIterator() {
return new ListItr(0);
}

// 在指定位置处遍历
public ListIterator<E> listIterator(int index) {
if (index < 0 || index > size)
throw new IndexOutOfBoundsException("Index: "+index);
return new ListItr(index);
}

// 继承 Itr 类,同时拥有父类的所有特性
private class ListItr extends Itr implements ListIterator<E> {
//指定位置进行遍历
ListItr(int index) {
super();
cursor = index;
}

//向前遍历集合
public boolean hasPrevious() {
return cursor != 0;
}

public int nextIndex() {
return cursor;
}

public int previousIndex() {
return cursor - 1;
}

@SuppressWarnings("unchecked")
public E previous() {
checkForComodification();
// 向前遍历,游标 - 1
int i = cursor - 1;
if (i < 0)
throw new NoSuchElementException();
Object[] elementData = ArrayList.this.elementData;
if (i >= elementData.length)
throw new ConcurrentModificationException();
cursor = i;
return (E) elementData[lastRet = i];
}

// 修改集合元素
public void set(E e) {
if (lastRet < 0)
throw new IllegalStateException();
checkForComodification();

try {
ArrayList.this.set(lastRet, e);
} catch (IndexOutOfBoundsException ex) {
throw new ConcurrentModificationException();
}
}

// 新增集合元素
public void add(E e) {
checkForComodification();

try {
int i = cursor;
ArrayList.this.add(i, e);
cursor = i + 1;
lastRet = -1;
expectedModCount = modCount;
} catch (IndexOutOfBoundsException ex) {
throw new ConcurrentModificationException();
}
}
}

为什么要有迭代器

我们已经清楚了 ArrayList 集合的具体迭代实现,但是有没有想过 Java 为什么要实现迭代器的方式来遍历集合呢,其中的奥秘和设计理念是什么,我们可以概况为:

Iterator 接口提供了遍历集合类的规范。它把访问逻辑从不同类型的集合类中抽象出来,从而避免向客户端暴露集合的内部结构(数组、链表等结构)。
例如,如果没有使用 Iterator,遍历一个数组的方法是使用索引:

1
2
3
for (int i=0; i<array.size(); i++) {
// TODO: get(i) ...
}

而访问一个链表(LinkedList)又必须使用 while 循环:

1
2
3
while ((e=e.next())!=null) {
// TODO: e.data() ...
}

以上两种方法客户端都必须事先知道集合的内部结构,访问代码和集合本身是紧耦合,无法将访问逻辑从集合类和客户端代码中分离出来,每一种集合对应一种遍历方法,客户端代码无法复用。更恐怖的是,如果以后需要把 ArrayList 更换为 LinkedList ,则原来的客户端代码必须全部重写。

为解决以上问题,Iterator模式总是用同一种逻辑来遍历集合:

1
2
3
for (Iterator it = c.iterater(); it.hasNext(); ) {
//...
}

奥秘在于客户端自身不维护遍历集合的”指针”,所有的内部状态(如当前元素位置,是否有下一个元素)都由 Iterator 来维护,而这个 Iterator 由集合类通过工厂方法生成,因此,它知道如何遍历整个集合。客户端从不直接和集合类打交道,它总是控制 Iterator ,向它发送”向前”,”向后”,”取当前元素”的命令,就可以间接遍历整个集合。

fail-fast 机制

通过阅读 ArrayList 迭代器源码,我们可以发现集合在迭代过程中,新增、修改或者删除集合元素时,程序有可能会抛出ConcurrentModificationException 异常,这个异常的设置,就是集合迭代 fail-fast 机制。大家可以在文章中搜索 ConcurrentModificationException 出现的地方,结合阅读源码来了解 fail-fast 机制实现逻辑。
fail-fast 机制具体可以概况为:

fail-fast 机制是java集合(Collection)中的一种错误机制。当多个线程对同一个集合的内容进行操作时,就可能会产生fail-fast事件。

fail-fast 目的

迭代器的快速失败行为无法得到保证,因为一般来说,不可能对是否出现不同步并发修改做出任何硬性保证。快速失败迭代器会尽最大努力抛出 ConcurrentModificationException。因此,为提高这类迭代器的正确性而编写一个依赖于此异常的程序是错误的做法:迭代器的快速失败行为应该仅用于检测 bug。

fail-fast 原因

ArrayList 集合维护了一个全局变量 modCount , 初始值为 0, 它是集合 AbstractList 抽象类里的。当我们调用 ArrayList 的 add 、 remove 、 clear 方法, modCount 变量值会增加,可以发现 modCount 值是用来记录集合发生修改的次数。阅读 ArrayList 迭代器实现代码,我们发现程序中有 int expectedModCount = modCount 的逻辑,当我们要迭代集合时,创建的迭代器的 expectedModCount 与 modCount 值相同,而当 ArrayList 发生修改时,modCount 值发生变化,而迭代器并没有同步到modCount 值的变化,当程序调用迭代器 next 方法,会触发程序设置的 checkForComodification 方法,而此时 expectedModCount != modCount ,则抛出 ConcurrentModificationException 异常。当然,迭代的程序检查到数组越界异常,或者当 cursor 的值大于 ArrayList 的 elementData.length 的值,也会抛出 ConcurrentModificationException 异常。

fail-fast 机制具体案例

单线程的情况下,直接调用 ArrayList 的 remove 方法

1
2
3
4
5
6
7
8
9
10
11
12
13
14
15
16
17
18
19
@Test
public void singleThreadArrayList(){

List<Integer> integerList = new ArrayList<Integer>();

integerList.add(1);

Iterator<Integer> iterator = integerList.iterator();

while (iterator.hasNext()){

Integer integer = iterator.next();
if(integer == 1){
// 调用 ArrayList 的 remove 方法后,expectedModCount != modCount,抛异常
// 调用 Iterator 的 remove 方法,则程序执行正常
integerList.remove(integer);
}
}
}

程序运行后抛出异常:
single_thread_iterator

多线程环境中,调用 Iterator 的 remove 方法

1
2
3
4
5
6
7
8
9
10
11
12
13
14
15
16
17
18
19
20
21
22
23
24
25
26
27
28
29
30
31
32
33
34
35
36
37
38
39
40
41
42
43
44
45
46
47
48
49
50
51
52
53
54
55
56
private List<Integer> integerList = new ArrayList<>();

@Test
public void multiThreadArrayList(){

for(int i = 0 ; i < 10;i++){
integerList.add(i);
}


Thread oneThread = new Thread(() -> {
Iterator<Integer> iterator = integerList.iterator();

while (iterator.hasNext()){

int value = iterator.next();

System.out.println("thread one iterator value:" + value);

try {
Thread.sleep(1L);
} catch (InterruptedException e) {
e.printStackTrace();
}

}
});

Thread twoThread = new Thread(() ->{

Iterator<Integer> iterator = integerList.iterator();

while (iterator.hasNext()){

int value = iterator.next();

System.out.println("thread two iterator value:" + value);
if( value == 8){
System.out.println("thread two remove value:" + value);
iterator.remove();
}
}

});

oneThread.start();
twoThread.start();

try {
//等待线程 one 执行完成
oneThread.join();
} catch (InterruptedException e) {
e.printStackTrace();
}

}

程序运行后抛出异常:
mulit_thread_iterator

多线程的情况下修改集合元素一定要谨慎,以免程序异常。

子集操作及注意事项

有时我们可能只想取得 List 集合中的某段连续的集合元素,ArrayList 和 Vector 都提供了 subList 方法来截取集合的一部分来方便我们的使用。但是,这个功能带来方便的同时,也需要注意:

subList 返回仅仅只是集合对象一个视图,操作 subList 后原集合对象也会被修改。

SubList 类是 ArrayList 类里的一个内部类,subList 也提供了操作集合的 新增 add ,修改 set, 删除 remove, 获取 get 等方法,还实现了子集合迭代的功能。我们通过源码看看其内部实现:

1
2
3
4
5
6
7
8
9
10
11
12
13
14
15
16
17
18
19
20
21
22
23
24
25
26
27
28
29
30
31
32
33
34
35
36
37
38
39
40
41
42
43
44
45
46
47
48
49
50
51
52
53
54
55
56
57
58
59
60
61
62
63
64
65
66
67
68
69
70
71
72
73
74
75
76
77
78
79
80
81
82
83
84
85
86
87
88
89
90
91
92
93
94
95
96
97
98
99
100
101
102
103
104
105
106
107
108
109
110
111
112
113
114
115
116
117
118
119
120
121
122
123
124
125
126
127
128
129
130
131
132
133
134
135
136
137
138
139
140
141
142
143
144
145
146
147
148
149
150
151
152
153
154
155
156
157
158
159
160
161
162
163
164
165
166
167
168
169
170
171
172
173
174
175
176
177
178
179
180
181
182
183
184
185
186
187
188
189
190
191
192
193
194
195
196
197
198
199
200
201
202
203
204
205
206
207
208
209
210
211
212
213
214
215
216
217
218
219
220
221
222
223
224
225
226
227
228
229
230
231
232
233
234
235
236

// 从当前 List 中创建一个指定起始位置和结束位置的 subList
public List<E> subList(int fromIndex, int toIndex) {
// 边界检查
subListRangeCheck(fromIndex, toIndex, size);
// this 指代当前对象,并传到 SubList 中
return new SubList(this, 0, fromIndex, toIndex);
}

static void subListRangeCheck(int fromIndex, int toIndex, int size) {
if (fromIndex < 0)
throw new IndexOutOfBoundsException("fromIndex = " + fromIndex);
if (toIndex > size)
throw new IndexOutOfBoundsException("toIndex = " + toIndex);
if (fromIndex > toIndex)
throw new IllegalArgumentException("fromIndex(" + fromIndex +
") > toIndex(" + toIndex + ")");
}

private class SubList extends AbstractList<E> implements RandomAccess {
private final AbstractList<E> parent;
private final int parentOffset;
private final int offset;
int size;

SubList(AbstractList<E> parent,
int offset, int fromIndex, int toIndex) {
this.parent = parent;
this.parentOffset = fromIndex;
this.offset = offset + fromIndex;
this.size = toIndex - fromIndex;
this.modCount = ArrayList.this.modCount;
}

// 修改子集合中的元素
public E set(int index, E e) {
rangeCheck(index);
checkForComodification();
// 获取到 this 对象的 ArrayList 中的元素
E oldValue = ArrayList.this.elementData(offset + index);
// 同时 this 指代的 ArrayList 集合中的元素也被修改
ArrayList.this.elementData[offset + index] = e;
return oldValue;
}

// 获取子集合中指定位置的元素
public E get(int index) {
rangeCheck(index);
// 检查是否修改,fail-fast 机制
checkForComodification();
return ArrayList.this.elementData(offset + index);
}

// 子集合长度的大小
public int size() {
checkForComodification();
return this.size;
}

// 在指定位置修改集合元素
public void add(int index, E e) {
rangeCheckForAdd(index);
checkForComodification();
parent.add(parentOffset + index, e);
this.modCount = parent.modCount;
this.size++;
}

//删除指定位置的元素
public E remove(int index) {
rangeCheck(index);
checkForComodification();
E result = parent.remove(parentOffset + index);
this.modCount = parent.modCount;
this.size--;
return result;
}

// 按照范围删除元素
protected void removeRange(int fromIndex, int toIndex) {
checkForComodification();
parent.removeRange(parentOffset + fromIndex,
parentOffset + toIndex);
this.modCount = parent.modCount;
this.size -= toIndex - fromIndex;
}

// 增加集合元素
public boolean addAll(Collection<? extends E> c) {
return addAll(this.size, c);
}

// 指定位置出增加集合元素
public boolean addAll(int index, Collection<? extends E> c) {
rangeCheckForAdd(index);
int cSize = c.size();
if (cSize==0)
return false;

checkForComodification();
parent.addAll(parentOffset + index, c);
this.modCount = parent.modCount;
this.size += cSize;
return true;
}

// 迭代实现
public Iterator<E> iterator() {
return listIterator();
}

public ListIterator<E> listIterator(final int index) {
checkForComodification();
rangeCheckForAdd(index);
final int offset = this.offset;

return new ListIterator<E>() {
int cursor = index;
int lastRet = -1;
int expectedModCount = ArrayList.this.modCount;

public boolean hasNext() {
return cursor != SubList.this.size;
}

@SuppressWarnings("unchecked")
public E next() {
checkForComodification();
int i = cursor;
if (i >= SubList.this.size)
throw new NoSuchElementException();
Object[] elementData = ArrayList.this.elementData;
if (offset + i >= elementData.length)
throw new ConcurrentModificationException();
cursor = i + 1;
return (E) elementData[offset + (lastRet = i)];
}

public boolean hasPrevious() {
return cursor != 0;
}

@SuppressWarnings("unchecked")
public E previous() {
checkForComodification();
int i = cursor - 1;
if (i < 0)
throw new NoSuchElementException();
Object[] elementData = ArrayList.this.elementData;
if (offset + i >= elementData.length)
throw new ConcurrentModificationException();
cursor = i;
return (E) elementData[offset + (lastRet = i)];
}

@SuppressWarnings("unchecked")
public void forEachRemaining(Consumer<? super E> consumer) {
Objects.requireNonNull(consumer);
final int size = SubList.this.size;
int i = cursor;
if (i >= size) {
return;
}
final Object[] elementData = ArrayList.this.elementData;
if (offset + i >= elementData.length) {
throw new ConcurrentModificationException();
}
while (i != size && modCount == expectedModCount) {
consumer.accept((E) elementData[offset + (i++)]);
}
// update once at end of iteration to reduce heap write traffic
lastRet = cursor = i;
checkForComodification();
}

public int nextIndex() {
return cursor;
}

public int previousIndex() {
return cursor - 1;
}

public void remove() {
if (lastRet < 0)
throw new IllegalStateException();
checkForComodification();

try {
SubList.this.remove(lastRet);
cursor = lastRet;
lastRet = -1;
expectedModCount = ArrayList.this.modCount;
} catch (IndexOutOfBoundsException ex) {
throw new ConcurrentModificationException();
}
}

public void set(E e) {
if (lastRet < 0)
throw new IllegalStateException();
checkForComodification();

try {
ArrayList.this.set(offset + lastRet, e);
} catch (IndexOutOfBoundsException ex) {
throw new ConcurrentModificationException();
}
}

public void add(E e) {
checkForComodification();

try {
int i = cursor;
SubList.this.add(i, e);
cursor = i + 1;
lastRet = -1;
expectedModCount = ArrayList.this.modCount;
} catch (IndexOutOfBoundsException ex) {
throw new ConcurrentModificationException();
}
}

final void checkForComodification() {
if (expectedModCount != ArrayList.this.modCount)
throw new ConcurrentModificationException();
}
};
}

public List<E> subList(int fromIndex, int toIndex) {
subListRangeCheck(fromIndex, toIndex, size);
return new SubList(this, offset, fromIndex, toIndex);
}
}

总结

  • ArrayList 和 Vector 是一个可扩展,有序 ,可以迭代的集合类实现
  • 创建集合的时候,如果预先知道集合的大小,可以创建具体大小的集合,这样可以避免集合不断扩展而造成的性能影响
  • fail-fast 机制是为了预防并发修改集合元素,而造成的迭代集合元素不一致的问题。自行编程不能依赖于这种机制,只能用于检测 bug
  • subList 返回仅仅只是集合对象一个视图,操作 subList 后原集合对象也会被修改

参考文章

When to use LinkedList over ArrayList?
Java提高篇(三四)—–fail-fast机制
Java中的fail-fast机制
subList的缺陷
Java: split a List into two sub-Lists?

分享到 评论